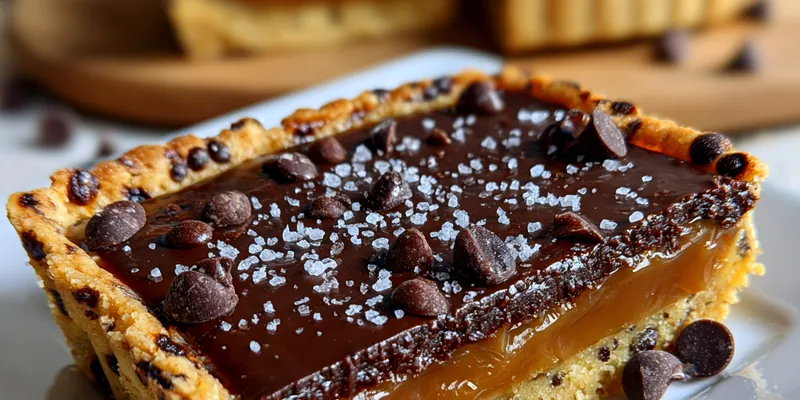
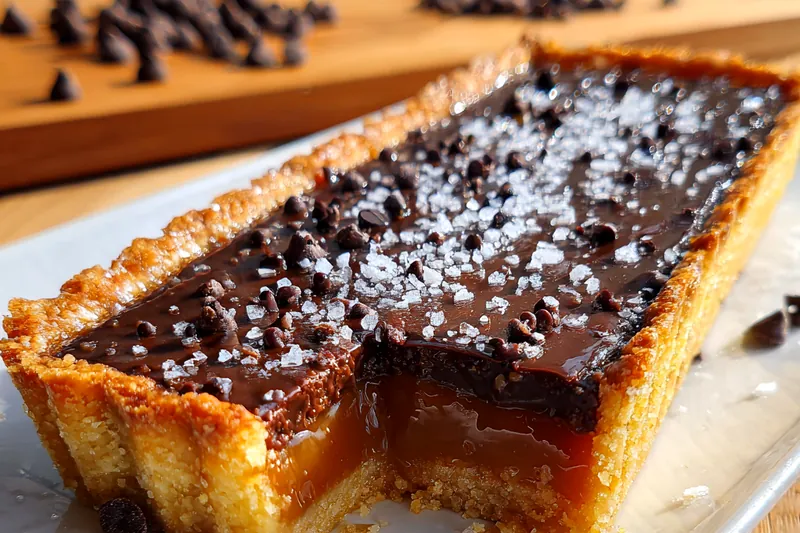
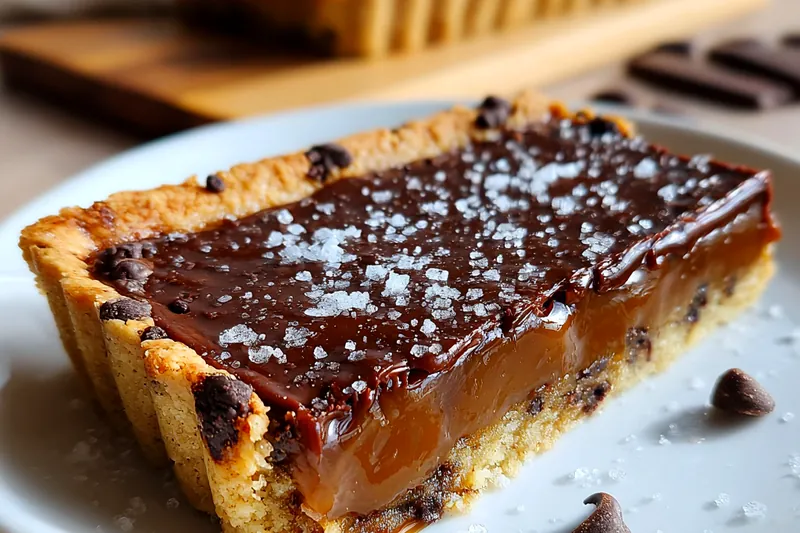
Salted Caramel Chocolate Tart
This Salted Caramel Chocolate Tart is the ultimate indulgence for any chocolate lover. With its rich chocolate filling and buttery tart shell, it's a perfect dessert for special occasions. The addition of salted caramel elevates the flavor profile, making each bite a delightful experience. Impress your guests with this easy yet elegant tart!

Why This Salted Caramel Chocolate Tart Recipe Works
This recipe stands out due to the perfect harmony of flavors between the rich chocolate and the sweet, salty caramel. The tart shell adds a delightful crunch that complements the creamy filling, making it an irresistible dessert. It’s also versatile, allowing for various garnishes like berries or nuts to enhance its presentation.
The technique used in this recipe ensures that the tart shell is both flaky and sturdy, while the filling remains silky smooth. By chilling the tart, we allow the chocolate and caramel to set perfectly without compromising their flavors. This results in a dessert that not only looks stunning but tastes incredible.
💡 Professional Tip
When making the caramel, be cautious as it can quickly go from perfectly caramelized to burnt. Stir constantly and remove from heat as soon as it reaches a deep amber color. For the best texture, ensure your tart shell is completely cooled before adding the filling to prevent it from sinking.
Frequently Asked Questions
Yes, you can prepare the tart a day in advance. After assembling the tart, store it in the refrigerator until you're ready to serve. This allows the flavors to meld beautifully and makes it convenient for entertaining.
If you’re looking for a lighter option, you can substitute heavy cream with coconut cream or a non-dairy cream alternative. However, keep in mind that this may slightly alter the flavor and texture of the filling.
The tart is done when the chocolate filling is set but still slightly soft to the touch. It should hold its shape when sliced but have a creamy consistency. Refrigerating for at least an hour helps achieve this perfect texture.
Yes, you can freeze the tart for up to a month. To do so, wrap it tightly in plastic wrap and then in aluminum foil. When ready to serve, thaw it in the refrigerator overnight for the best results.
This tart pairs wonderfully with a scoop of vanilla ice cream or a dollop of whipped cream. Fresh berries also complement the rich flavors, adding a refreshing contrast.
The tart can be stored in the refrigerator for up to 5 days. Make sure it's covered to keep it fresh and prevent it from absorbing other odors in the fridge.
Absolutely! This tart can be made a day or two ahead of time. Just follow the steps for assembly and refrigerate until you're ready to serve. It’s a great make-ahead dessert for gatherings.
To reheat, slice the tart and place it in the microwave for about 10-15 seconds or until slightly warm. Be careful not to overheat, as it may alter the texture of the chocolate filling.
Recipe Troubleshooting Guide
Too Dry
Problem: If your tart shell turns out dry, it may be due to overbaking.
Solution: To prevent this, keep an eye on the baking time and test by lightly pressing the center; it should feel firm but not hard.
Not Crispy Enough
Problem: A tart shell that isn't crispy may not have been baked long enough.
Solution: Ensure the shell is baked until it's firm and slightly golden; you can also blind bake it for a few extra minutes for added crispiness.
Overcooked
Problem: Overcooking the chocolate filling can cause it to become grainy.
Prevention: To prevent this, monitor the heat carefully while melting the chocolate and remove from heat as soon as it's melted and smooth.
Undercooked Center
Problem: If the center of your tart is undercooked, it may not have set properly.
Recovery: Refrigerate for an additional hour to allow the filling to firm up, or return to the refrigerator if you notice it is still too soft.
Burnt Exterior
Problem: A burnt crust can result from too high a temperature or prolonged baking.
Prevention: Lower the oven temperature slightly and keep an eye on the tart as it bakes to achieve a golden, not burnt, crust.
Flavor Balance
Too Sweet: If the tart is too sweet, consider adding a pinch of sea salt to balance the flavors.
Too Salty: If it’s too salty, you can balance it with a bit of sugar or serve with a sweetened whipped cream.
Bland: If the flavor is bland, enhance it with vanilla extract or a splash of espresso to deepen the chocolate flavor.
Essential Ingredients for Salted Caramel Chocolate Tart
The primary ingredients for this tart include high-quality dark chocolate, fresh heavy cream, and real butter. Opt for premium chocolate with a high cocoa content for the best flavor. A good-quality cocoa powder is essential for the tart crust, contributing to its rich taste.
Using fresh ingredients greatly impacts the final product. Ensure that your butter is unsalted and cold for the crust, while the eggs should be fresh to achieve the right texture in the filling. The quality of your caramel also enhances the overall taste.
Essential Ingredient Notes
- Dark Chocolate: Choose a dark chocolate with at least 70% cocoa solids for a rich, deep flavor that perfectly complements the sweetness of the caramel.
- Butter: Using cold, unsalted butter in your tart crust ensures a flaky texture. Avoid overworking the dough to maintain its tenderness.
- Sea Salt: Using flaky sea salt as a topping not only adds flavor but also enhances the dessert's visual appeal. A sprinkle just before serving makes all the difference.
Step-by-Step Cooking Process
The cooking process involves several key steps to achieve the perfect tart. From making the tart shell to preparing the rich chocolate filling, each step requires attention to detail. The caramel sauce is a crucial element that ties the flavors together, creating a luxurious experience.
By following the steps carefully, you can achieve a beautifully set tart with a perfect balance of sweetness and saltiness. The chilling process is vital for texture, ensuring each slice holds its shape while remaining creamy.
Key Technique for Perfect Salted Caramel Chocolate Tart
The most important technique in this recipe is mastering the caramel. Achieving the right color and consistency is crucial; it should be deep amber and smooth without any lumps. Incorporating the cream slowly helps prevent the mixture from seizing up, ensuring a creamy filling.
Salted Caramel Chocolate Tart
📋 Ingredients
Main Ingredients
- 1 cup heavy creamRoom temperature
- 1 cup granulated sugarFor caramel
- 6 tablespoons unsalted butterCut into pieces
- 1 teaspoon sea saltFor flavor
- 8 ounces dark chocolateChopped
For the Sauce
- 1 ½ cups all-purpose flourFor crust
- ½ cup unsweetened cocoa powderFor crust
- ½ cup powdered sugarFor crust
- ½ cup cold unsalted butterCubed
- 1 large egg yolkFor binding
- 3 tablespoons ice waterFor dough
- 1 teaspoon vanilla extractFor flavor
- 1 tablespoon flaky sea saltFor topping
Instructions
Make the Tart Shell
In a food processor, combine flour, cocoa powder, powdered sugar, and cold butter. Pulse until the mixture resembles coarse crumbs. Add egg yolk and ice water, pulsing until the dough comes together. Press into a tart pan and chill for 30 minutes.
Bake the Tart Shell
Preheat the oven to 350°F (175°C). Bake the tart shell for 20 minutes, then remove from oven and let cool.
Prepare the Caramel
In a saucepan, heat granulated sugar over medium heat, stirring until it melts and turns amber. Remove from heat and carefully whisk in the cream and butter until smooth. Stir in sea salt and let cool slightly.
Make the Chocolate Filling
In a heatproof bowl, combine chopped dark chocolate and vanilla extract. Pour the warm caramel over the chocolate and let sit for a minute, then stir until smooth.
Assemble the Tart
Pour the chocolate filling into the cooled tart shell. Spread evenly and refrigerate until set, about 1 hour.
Garnish and Serve
Once set, sprinkle the top with flaky sea salt. Garnish with fresh berries and mint leaves if desired. Slice and serve chilled.
Recipe Notes & Tips
Storage Tips
To keep your Salted Caramel Chocolate Tart fresh, store it in an airtight container in the refrigerator. It can last for up to 5 days. If you need to keep it longer, consider freezing it as mentioned earlier.
Serving Suggestions
Serve your Salted Caramel Chocolate Tart with a side of vanilla ice cream or whipped cream for added indulgence. Fresh mint leaves can also enhance the presentation and flavor.
Recipe Variations
Feel free to experiment with the tart by adding different toppings, such as crushed nuts or caramel drizzle. For a fruitier version, try incorporating layers of fresh raspberries or strawberries inside the tart before adding the chocolate filling.